Monday, July 29, 2013

"ele story" is going to ENK in New York!

Hi again!  I copied this blog entry from my new website: judyjoudesign.com, b/c I think there are still lingering readers here. :)  Thanks for coming back!
"We're doing it!"  Hubby and I say this to each other every night, without fail in the last 3.5-4 months, as we head to bed completely exhausted from our day, and all night of working on what we now called our second child, "Ele Story" after our daughter is fast asleep.  We have just that much adrenaline pumping through our bodies to get us that extra ounce of energy to say that to each other, right before just conking out.
We literally decided to actually launch a children's clothing line just 4 months ago, even though it has been my dream to have a line of my own clothing designs for quite some time now.  I can't take the credit for this labor of love, even though I have done all the designing and artistic decisions on Ele Story--I could not have done it in the least bit if it weren't for my overly optimistic hubby for dragging me (the extreme opposite of him--overly pessimistic) "kicking and screaming" (his own words), on this journey.
I am so grateful he did--the first 3 weeks I thought our marriage would be over before we even have a single design done.  I am not lying--it was rough.  Even my own mother, who in her lifetime inspired me to be myself and do what I believe in, could not possibly have forced me to do this.  I probably would've rebelled.
In about a week (Aug 4-6), we will be showcasing our first Spring/Summer 2014 collection at ENK Children's Club in New York.  The collection has been truly a labor of love, tears, and much pain (physical pain from all the sewing and photoshopping...etc).  But it has come together at last!  We have had the support of so many friends and family in our lives--our parents, siblings, close friends, and even the friends on facebook following us so faithfully every week--they have made it possible to even keep going forward on this journey.
Four months ago we knew nothing about the fashion industry.  We didn't know how to get a design translated into a garment other than what I had done as a costume designer previously...I found out about hiring professional pattern makers, graders, markers, sample-makers, and manufacturers.  We had no idea how to get fabrics (like unlimited sources)--and now, at the end of these 4 months, I am in tears (ok, partly from the exhaustion of it all--not to mention working a full time job) just realizing how far we have come.
I had always told hubby that my goal of starting this clothing line was not to get rich (although that would be nice because we've spent our life savings so far on this dream of mine, hehe) : P, but it was really to pursue a dream that I never thought possible.  Before I turned the ripe age of 30 I told myself I was going to accomplish something I never thought I would be able to do--or that I hated to do--and that was running miles without stopping.  I set my mind to do it and I did it--and I suppose this is, on a much larger scale, just that.  I needed to do this so that I have at least given it a try.
Hubby reminds me constantly that my mom is looking down from heaven, smiling...I hope that she really is proud of what I have started.  I hope people will like the designs that I have created!
Follow us on our facebook page! (www.facebook.com/EleStory)


Friday, June 7, 2013

My "Ele Story" (My Kids' Clothing line) being written...

Hi readers!  Thank you for coming back again and again...even though I have moved to judyjoudesign.com, I know that there are still some that visit my blog here.  : )  Welcome!

Since you're here, I thought I'd take the opportunity to mention that I decided to follow my dreams to launch a children's clothing line, "ele story"...please visit my facebook page to "like" me and follow me there!

I am currently designing for spring/summer 2014...it's been a crazy ride, but so incredibly rewarding at the same time.  This logo just finally got completed this week!  whew!  now to the printers for labels and hang tags...


You can also read a little "about" Ele Story here:


Very recently, my baby girl June started humming a song she had learned in daycare that brought back memories of this very familiar tune my mother used to sing to me in my native tongue:
"Elephant, elephant,
Why is your nose so long?
Mama says, long noses
Are just beautiful..."
I love that the mom is teaching her baby elephant that her naturally long nose is what makes her beautiful.  In my own life, embracing the part that is "natural" has not been easy.  Despite having amazingly encouraging parents growing up, it wasn't always easy for me to be proud of who I was.  I was tall for my age and it made me awkward in pictures with my friends.  Even though I loved to draw, I was so self-conscious that I shied away from working on art projects in school and would wait till I got home to start.
Having lost my mom over 5 years ago now, I reflected on what a positive and encouraging influence she has had on me, and remembered that she has taught me to love what has been ingrained in me--which is a desire to create things with fabrics.  When I was about 5 or 6, I asked my mom (timidly, as if she would say 'no') if I could have a piece of lace to make dresses for my dolls.  I remember getting into a taxi with my mother and traveling deep into the fabric district of Taiwan to pick out my lace material.  When I received it in a plastic bag, I kept reaching inside to touch it.  It was a magical moment for me, and I remember being so giddy during the ride home.  I took other materials I had collected: used socks with holes, unwanted pj pants, and mom's pantyhose, and this new pristine lace, and quickly created a collection of dresses for my barbie doll.  Mother was beaming when she saw the finished product.
Fast-track 15 years, I was in my costume design MFA program (a story I'll leave for another post), not at all sure about my abilities to tackle a challenging design project.  My mom let me talk through the script with her, and with her great confidence and pride in me, told me "You're the best I know, and you'll figure this out."  She was telling me that what I have loved and invested my time and energy in all these years was not worthless--the little girl that had asked her for lace to make doll clothes with was following what was natural to her.  That she was destined for this.
I have been missing my mom horribly, especially as I face the daily challenges of motherhood with my baby girl, growing up all too quickly.  My mom was not perfect.  She made many mistakes in her life, her marriage, and even as my mother--but what she did right was the unwavering belief  she had in me.  It took me this long to realize, but she WAS my biggest fan, cheering always on the sidelines for me to embrace who I was.
Ever since I became a mom, my baby girl has inspired me to sew beautiful things for her.  She gets so excited when she sees new items hanging around our house that are made for her.  She has started saying "Mama's [clothes]" (in Chinese).  She is now my biggest fan (next to my loving hubby of course!), getting all giddy over clothes that I put on her to try on.  Her proud face while wearing my handmade garments makes me know that my mom is smiling down at me, and at her granddaughter whom she had never met.  Starting a children's clothing line has been my dream ever since--this is my "ele story" being written.

Tuesday, March 19, 2013

judyjoudesign.com

That's right...just over the weekend a good friend bravely volunteered to do some technical back end work for my new website, judyjoudesign.com.  So, within 24 hours, this site was launched (with me sketching like mad, and my friend doing research on how to get a website set up!), and became what it is now.  I am so grateful for the help, and am excited to announce it to the world.

So the journey of the jjdesign blog will continue on in my new page.  Most of the content will get ported over, over time...: )  Thank you for being such wonderful readers.  Cheers!

I got published!

Hello there!  I am so excited that I got published on HomeMadeSimple.com today!!

Please go to the link and support me! : )

Decorating with Fabric 


Saturday, March 2, 2013

Boat Oragami dress!

Made this custom dress for my friend's friend's baby girl. :)  It was especially fun as A let me have full freedom to do what I wanted.  I think I am going to make one for baby June...or maybe another style for her 2nd b-day party in 3 months (eeek!)


Saturday, February 23, 2013

For baby C...

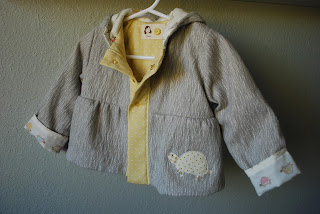
My friend at work had her baby Cleas, and while I normally don't post anything that I haven't gifted to the couple yet, I'm not sure when I'll actually get to go visit the baby--so I am breaking the rules and posting photos of the jacket I made for him.

It's actually my first jacket for a baby boy (there have been many girls!), but I used the same pattern (that I love) and made it fit for baby C.


Tuesday, February 19, 2013

Welcoming baby A...


My dear friends K & M just welcomed their beautiful baby girl to the world 3 days ago!  I swung by the hospital to see the little one, and gifted her parents with this...(I have been waiting for a long time to post, in fear that they'd see the post somehow before they got the gift). : )  I didn't actually see K & M open the box, so hopefully they like this little outfit...

Soft turtle print cotton voile (double-layered) found in Japan...
...became a little v-neck dress for baby A.

exposed hand stitching for snaps
a little turtle applique to bring a smile to K. : )


Felt applique decorative pillow!

This is long overdue--I had already "given" the downstairs tour when I whipped this pillow up one morning.  I was feeling the extra urgency of heading back to work after my sabbatical, so I needed to make every morning count.  This little project was super quick, and it made use of a small remnant piece from over a decade ago.  I love to not waste anything, so it was a double win. : )

Without further ado, here are some photos of the stages of making this pillow, in hopes that it can show you just how simple it is to make something like this.  Feeling inspired yet?  Go make something beautiful for your home!

1. Start by cutting out the appliqué 


2. Then cut a 2" strip of fabric, fold in half and gather (make sure the length is about 2x as much as the circumference of the circle)
 3. Sew both cover circles right sides together, sandwiching the gathered strip. Leave a 3" opening for the pillow stuffing.
4. turn inside out, and iron!
5. Place stuffing or pillow form inside.  Pin opening closed.
 6. Carefully run the opening through the machine to stitch shut. 


And that's it!  Enjoy what you have just made. : )  It's so simple and fun!


Friday, February 1, 2013

Home Sweet Home, part ii! Complete 1st floor house tour (in progress of course)

Hello there!  Thank you for bearing with me as I post (once again) about the house update.  To be honest, I hadn't given a "house tour" before because I never was home alone as I am now to clear away all the clutter to do proper photos to show you.  Of course, this is my house in progress, so please be kind as not all the walls have decorations yet.  That will come someday, hopefully soon!  

I thought I would take you through the house from the front entrance.  Note the new window seating we put in, mentioned in my last entry.  Also note the decades old Ethan Allen chairs Hubby inherited from a nice old lady back in LA.  They look fine in the photo, but definitely could use a reupholstering job someday.  Not by me though.  I'll happily pay someone, thankyouverymuch!


From the doorway, you keep going, and then you get a peak of the newly redone family room (yay!)

 Ok, before we move into the family room, let's take a look at what's to the right when you're facing the dark console (still debating if we should make it a lighter color...it's the dining room!  I love the light coming in from the French doors during the day.  I never get to enjoy that till I took the time off. hehe.

 Then June's little toy piano (hiding just to the left of the side table (that I put there for now for lack of better place...).  The newly scrubbed out fireplace too, which doesn't have any decor in it yet.
 June's giraffe rocker (courtesy of my friend Amy), and now we're back at the window seat.
Heading over now to the family room, which you have seen before.  But notice the eye-sore of a bookshelf is now replaced with this beautiful piece from Crate & Barrel which I had been wanting since over a year ago.  Hubby finally said I could get it, since I wouldn't stop nagging about how ugly the other one was.  Besides, now he's really making good use of the shelf space.  double-win!! 
 Another shot of the family room.  That's right, I just can't get enough of this fireplace which warms my heart. hee hee. ;)

 A closer look at this C&B beauty.  Believe or not, it cost us the same as an IKEA piece I was looking at...and not even close really, in quality.

Now...the 1-yr new kitchen view from the family room (finally clean for the shoot!)
 And then view from the dining room, which we saw earlier.  Love the amount of light coming in...
Ok, the only room you should probably take a peak at is my VERY in progress sewing room.  
Nothing to really beam about (yet), but can I just say that I made the magnetic chalkboard AND the button magnets on it?  Yes, I used some tools, took an old vanity mirror apart, and made this chalkboard.  I was SO proud.  And then I drew my logo on it.  It's my JJ Design studio!
The antique shelf of antique threads and buttons in the first pic is a find from hubby's grandma's old house.  It had spider egg sacs all over it, actually, when I pleaded with Hubby to take it home with us.  He was extremely grossed out, but I think my pleading worked!  I refreshed parts of the paint, and it's looking great! 

Also, I don't think I ever shared my sewing nook with anyone, partly b/c it's always a mess.  But this little closet nook was already in the room when we moved in, so I looked high and low for a desk that would fit perfectly (since we're NOT handy people)...and found it on Overstock.com!!  It is the perfect size.  It literally couldn't have been 1/8" wider.  It just fit.  Then Hubby and the dad-in-law helped to put up some shelves for me.  I love the shelving, just wish it was more organized.  

Ok, I think that's all I have to share right now for the downstairs of our house.  Upstairs will have to be another time.  Maybe when I take another sabbatical I'll get to cleaning up and decorating up there too.  Although you have seen plenty of Baby J's room from last year, and also her bathroom.  So I guess we just have the master, master bath, and the guest room left!  I promise I'll get it out one of these days...

Thanks for reading through all this!  Hope to see you again soon!

Tuesday, January 22, 2013

At last!!! Updates to Home Sweet Home...

It's been a busy month, even with an extended month off from work, I actually feel more exhausted than when I was working--but a happy exhaustion at that, as I am finally making over the home!

It has been a year since we moved here, and while I was happy generally with the house (newly painted and all), I wasn't quite as proud of the decor--because there was none to speak of.

So this break, I wanted to focus on a couple of spaces in our home (Hubby warned me to not be overly ambitious, so I tried...hmm...), and even though it's not entirely done still, I couldn't wait to post these for you.  Thank you for waiting so patiently!

Family Room
"In Progress" photos:
The in-progress family room...shelf to left of fireplace to be replaced soon.
I should add that things started to come together for me after I found these great mustard yellow and gray decorative pillows (I'll have a close up soon), and then I found the courage to go with a WILD safari rug (wild for me, since I'm usually pretty tame. haha.  Lesson learned here is sometimes you just have to get one right piece first, and the rest will fall into place!
The newly improved fireplace, with some ferns growing inside of it!
I spent a couple hours scouring the inside of this 20+ old fireplace.  I don't think anyone has ever attempted to do it, as it was super SOOTY.  For days, I contemplated on how to brighten up this little space without completely rendering the fireplace useless (lest someday a family after us wants to use it...yes, I am a long-term kind of gal).  I thought about painting it, but if someone were to use it, the paint would bubble and peel off (found out fireplace parts need to be painted by the manufacture, or at least I was told).  So I'm proud to say that I found my solution to the fireplace beautification problem at Marshall's, where I had been a dozen times the last 2 weeks--always looking for some home decor inspiration.  Anyway, what you're looking at is a gray-n-white zig-zag contact paper!  What a brilliant idea! (pat, pat : p)  That way I can peel it off if I ever wanted to change the decor.  

I envisioned a aluminum planter, but found a painted metal one at IKEA.  Since all the ferns were close to dying there, I picked up a few healthy ones at Home Depot.  The artwork behind it is a drawing I did when I was little of a bundle of withering flowers--didn't know where to put it, so thought it would look neat inside.


My first wall gallery of art by my artist friends, ourselves, & even baby june!

Above you'll see the gallery of artwork.  It's just the beginning--I know I have some prints that I still have around somewhere, but I decided I would start with what I have and build upon it.  It ended up being a lot more colorful than I had thought, but I kind of like it.  Baby J's handprints at 5 months is on the top right--I just love that she contributed to the wall too!  And Hubby's watercolor painting of us eating his chicken katsu (japanese chicken fried steak) on a V-day from ages ago, I finally decided to feature it. :)

NOTE: see the doorbell on the upper left of the picture gallery?  (Before pic below)  Well, I decided for now, I would paint this eyesore out with the color of the wall.  It kind of did the trick, not drawing too much attention to itself.  Yes, I was feeling quite pleased and handy. ; )

"Before" photos:
This is a shot of the fireplace about a year ago...
Then some mindless adding of "stuff".  Particularly not fond of the shelf lined with DVD's.

Hubby's video games spewing out of the TV console...oy!
Oh, how "lucky" we are to have 2 fireplaces!  My mission was to beautify it.
My very handy Hubby unrolling the newly purchased rug, just 2 weeks ago!

Baby J's Bathroom
Since my last bathroom art post, I have done a great new thing (not at all well-represented in this photo since the bathroom window is always going to create a backlight unless I become a master at shooting these shots--maybe in another life)--I hid the fugly (freakin' ugly--I don't use swear words) shower doors in June's bathroom with a simple solution!

I bought a brushed metal tension rod from Target and, remembering I had some semi sheer windowpane curtains (I had made almost 10 years ago for my first apartment, then we used it in June's first nursery at our last place), I hung them high off the ceiling to hide the shower doors we can't afford to replace.  This also makes the bathroom feel more elegant and more spacious because of the dramatic height of the curtains (taller than the standard shower curtain height of 72").  


Hmmm, no "before" photos of the shower doors, but I thought you'd like to see how much Baby J enjoys her new bathroom, right when she woke up!

Living Room
If you remember from my very first post over a year ago (*sigh* another reminder of how long this has taken...) of our house, you'll see that this was a very inexpensive solution to create the window seating I had always dreamt of but couldn't afford, and don't have the skills to build.  
The original window before moving in...
The new window seating, with added upholstered by me. :)

This was an IKEA Expedit shelf turned on its side.  I wanted a built-in shelf but no one in my family (basically myself and hubby) is handy like that, so we built this one with baby J's help!  Then I bought foam on sale at Jo-Ann's, and upholstered the cushion, finished with piping that you can't even see...great. : p

Anyway, it was exciting to see it come together, after seeing so many ideas on Ikeahacker.net.  I intentionally made the cushion longer so that it would stay in the window opening.  I love that baby J has a little more storage for her toys and books.  She seems to enjoy it too.